New text-to-speech voices in Windows 10 Creators Update

This update to Windows 10 has arrived, and it has more text-to-speech voices.

First, these are again Windows Mobile voices, not SAPI5, so your screenreader or other application may not be able to see or use them.

Second, there appear to be no additional languages, but there are reported to be “more than ten” new voices (e.g. male voices where before there were only female). I’ve identified two new accents or language variants that are new: Australian English and Canadian English.

I believe the full list of Windows Mobile voices as they stand now for Windows 10 Creators Update in 2017 is given in this Microsoft Support article: TTS voices. 

Sorry, they deleted that page too. Here’s a PDF of the latest support page for Narrator, which has text-to-speech voices in Narrator – Windows Mobile and SAPI5. Appendix A Supported languages and voices in Narrator in Windows 10 – Windows Help

New Text-to-Speech voices in Windows 10 Anniversary Update

Windows has always come with free text-to-speech voices. Windows 10 Anniversary Update, shipped August 2016, comes with new voices too. Hooray!

But there’s a catch: these are all Windows Mobile voices, not SAPI5 voices. So desktop Windows applications that use SAPI5 cannot use them: Universal Windows Apps (Windows Store apps, or Metro apps) that you get from the Windows Store can use them, and MSDN suggests that developers of desktop Windows applications (e.g. screenreaders) can now use them, but they need to write some code – they can’t use SAPI5. See my previous blog post explaining the difference between SAPI5 and Windows Mobile voices.

In simple English: Windows may have these voices, but it does not mean your Windows screenreader will be able to use them. They won’t show up. Contact the developer.

One application that CAN use them is Windows Narrator! Narrator can use both traditional SAPI5 voices and also the new Windows Mobile voices. So there is now (for example) a free Arabic screenreader!

On to the list. Windows 10 Anniversary Update provides the following new voices according to the MSDN Accessiblity blog and I’ve tested a few out:

  • Arabic (Egypt)
  • Catalan (Spain)
  • Danish (Denmark)
  • Dutch (Belgium)
  • Dutch (Netherlands)
  • Finnish (Finland)
  • French (Canada)
  • Norwegian (Norway)
  • Portuguese (Brazil)
  • Portuguese (Portugal)
  • Spanish (Mexico)
  • Swedish (Sweden)
  • Turkish (Turkey)

You can access these from Start > Settings > Time & Language > Region & Language > Language section. This lets you add more languages to Windows and shows the languages you already have installed.
Click on Add to add a new language to Windows and add the language for the voice you want to use.
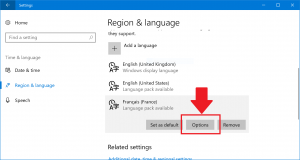
Click on any installed voice and an Options button appears. Clicking this displays an Options button, which lets you download the Voice if you haven’t already.

Finally, for completeness here are the Windows 8 and 10 SAPI5 voices you can get through Control Panel > Clock, Language and Region > Language, and listed on MSDN:

  • English (US) David
  • English (UK) Hazel
  • English (US) Zira
  • English (India) Heera
  • Korean Heami
  • Spanish (Spain) Helena
  • Spanish (Mexico) Sabina
  • French Hortense
  • German Hedda
  • Japanese Haruka
  • Chinese (simplified) Hanhan and Huihui
  • Chinese (traditional) Tracy
  • Italian Elsa
  • Polish Paulina
  • Portuguese (Brazil) Maria
  • Russian Irina

WebbIE Web Browser 4.5.2

I’ve updated the WebbIE Web Browser. No new features, but significant plumbing improvements I hope. Non-technical readers can stop here!

One of the big problems that WebbIE has is when to update the text view it generates for each web page. Back when WebbIE started off in 2001 this was pretty easy, though HTML frames were a bit tricky: you waited until a page loaded, parsed it, and the user was good to go until the next web page transition.

You don’t see HTML frames much nowadays in 2016, but many more web pages dynamically load and amend their content using JavaScript and talking to servers in the background but without loading a new page. Worse, much of this is either useless junk (loading advertisements) or a distraction for the user (an auto-updating chat sidebar when the user is trying to fill in a form).

WebbIE therefore tries to update only when (1) it knows there is a new page transition or (2) the user does something that plausibly would result in a page transition, like clicking a button. In the second case WebbIE simply waits a bit, then triggers a refresh if there has not been a page transition. So really the problem is “have we had a new page transition?”

WebbIE uses Internet Explorer through COM, so how do we detect Internet Explorer doing a page transition? Here are some things I’ve used:

  • Watching the status bar text to see if it says “Done”. This was surprisingly effective! Would need to internationalise the phrase to check for non-English users.
  • Using the DocumentComplete event fired by Internet Explorer. This isn’t trivial, because it fires for a page, saying it is done (.ReadyState is COMPLETE), but ALSO fires for any FRAME elements BEFORE the actual page (FRAMESET), and ALSO then fires for any later IFRAMEs loaded by the page – and until the page is finished you can’t know how many IFRAMEs will be loaded. I do use this as a fallback for the JavaScript onload event, though.
  • Hooking the onload JavaScript event. This is what we’re doing in WebbIE now. Essentially it’s outsourcing the problem of knowing when the page is loaded to the agent with the best chance of knowing – the web browser itself.

And here are some to try out in the future!

  • WAI-ARIA events – good for later versions of Internet Explorer, so a plausible approach in the future as more Windows machines get updated.
  • UIA events – the accessibility interface is getting some more tender loving care from Microsoft in the last few years, probably trying to catch up with the perception that Apple is better on accessibility.

Making your (Windows) computer easier to use with a sight problem

This is a set of suggestions and tips for helping you or someone you know with problems with sight to use their Windows computer. It’s probably most useful for a technically-minded person looking to help someone with sight loss but still some vision. Age-related sight loss, for example. If you are completely blind you will need a screenreader and more specialist training.

The focus is on changing Windows settings and free and low-cost software. It’s basically the things I would do if I was round your house trying to get your PC set up to be useful for you.

I’m assuming you’re on Windows 10, which has better accessibility features than previous versions. Windows 8 is just about as good, and Windows 7 is okay, but earlier than that and you really should upgrade.

I start, though, with a couple of hardware suggestions.

Get a big TV or monitor

If you have an HDMI output from your computer (most computers do nowadays) you can plug it into a big television or a big monitor to give you a bigger brighter display. A relatively inexpensive 22″ TV will work fine. You can try plugging your TV in to see how it works!

Get a high-visibility physical keyboard

You can buy keyboards with bright big yellow-on-black keys. This will help you find all the key combinations you’re going to be using. For example, from the RNIB Shop:
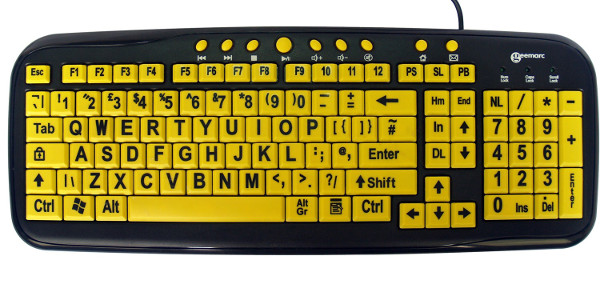
Black-on-yellow keys and big letters and numbers make this keyboard easier to see and use.

Now on to changing your Windows settings.

Change your display scaling and/or screen resolution

This is surprisingly tricky because there are two settings in Windows that interact.

You can change the screen scaling or DPI (dots per inch). This is in “Start”, “Settings”, “System”, “Display”, “Change the size of text, apps and other items”. Drag the slider left to make things smaller and right to make them bigger.
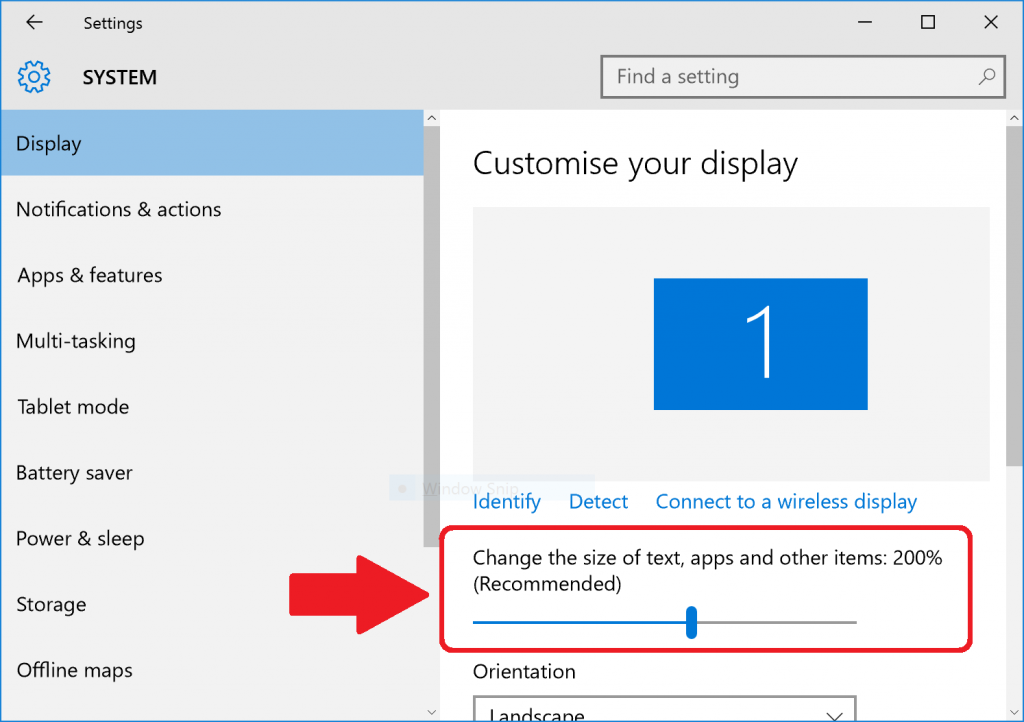
The Settings, Display dialog that lets you change text size. The slider makes text and anything else on the screen bigger and smaller.

You’ll have to sign out and sign in to see the full effects. You might not be able to drag the slider to make things bigger if you have a low-resolution screen: see “Get a big TV or monitor” above or read on.

Changing the screen scaling or DPI used to work very badly: lots of applications would not display correctly, with overlapping text and missing buttons. Nowadays things work much better. Note that older Windows machines (e.g. Windows 7) won’t let you scale much here so you’re better off with Windows 10.

The alternative to changing the screen scaling or DPI is to change the screen resolution. This is a cruder option, but means every application continues to display correctly. It won’t look pretty to people with good vision, but you probably don’t care about that. This is in “Start”, “Settings”, “System”, “Display”, scroll to the bottom and follow the “Advanced display settings” link, and change the value in the “Resolution” box. The smaller the resolution – the lower the numbers – the bigger everything will get. ScreenResolutionSettingsWindows10
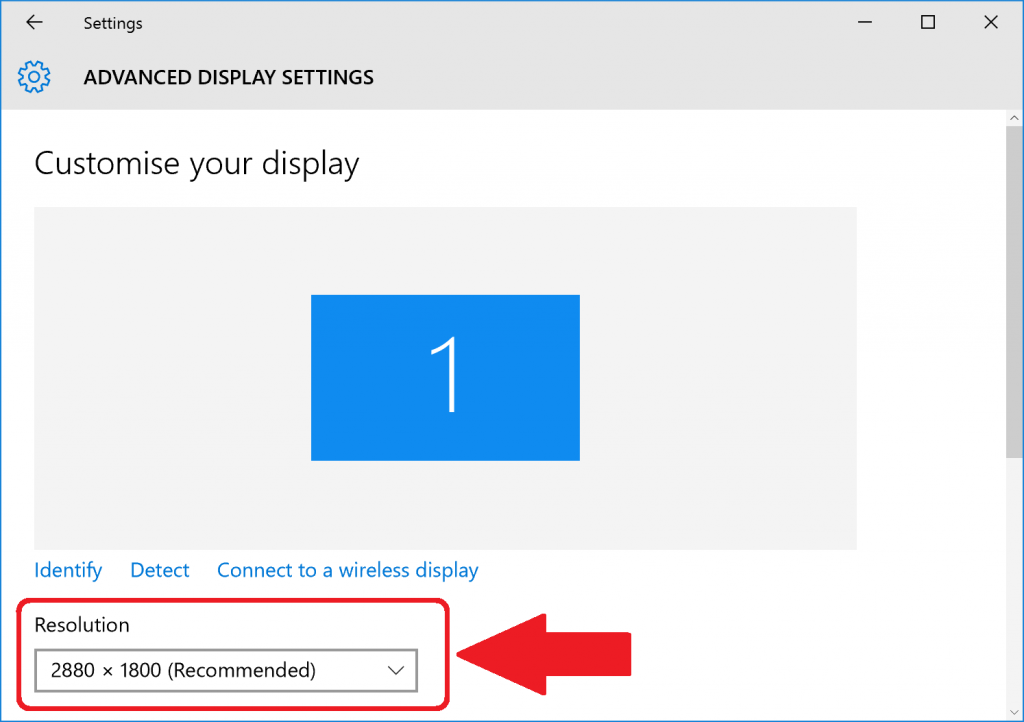
Again, sign out and in to check the full effects.

Finally, things get trickier if you have multiple monitors – like a really big screen plugged into your laptop. You may find some resolutions or scaling levels are unavailable. You could try restricting Windows’ output to just the big monitor you want to use by pressing the Windows key and P together to bring up the Project options, then selecting “Second screen only”. There is more complexity over choosing monitors that I won’t go into here, but “Display” is where you’ll find settings if you look.

Whichever way you do it, some things won’t fit on the screen if you make everything really big. Not much you can do about that.

Make the mouse pointer bigger

“Start”, “Control Panel”, “Hardware and Sound”, and under “Devices and Printers” you’ll see a link for “Mouse”. Go to the “Pointers” tab and select the drop-down in the “Schema” section. There you will find several schemes labelled “extra-large” that make the mouse pointer bigger and easier to see.
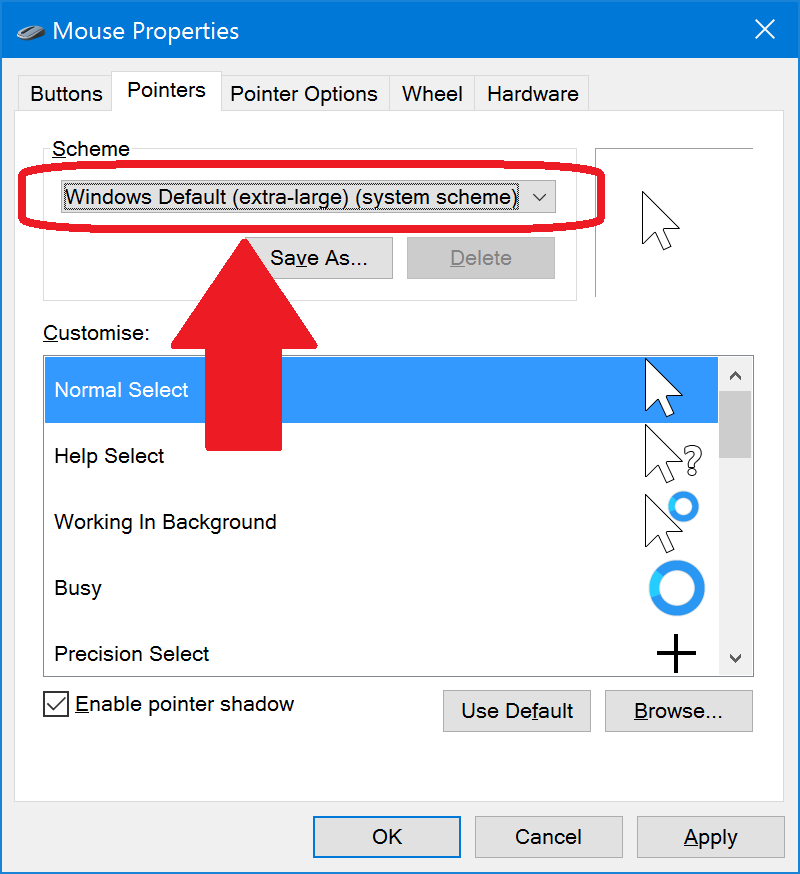
Combobox "Scheme" lets you select a different mouse cursor size. Choose "Extra-large"

Switch to a High-Contrast Theme

These make Windows use more contrasting colours for things like window edges and title bars so you can see them more clearly. You can also make the colour scheme yellow or white on black, which might be easier on your eyes.

You can find the High-Contrast themes in “Start”, “Control Panel”, “Appearance and Personalisation”, “Personalisation”. Under “Change the visuals and sounds on your computer” you’ll find four themes labelled “High Contrast”. Pick one of those to try it.
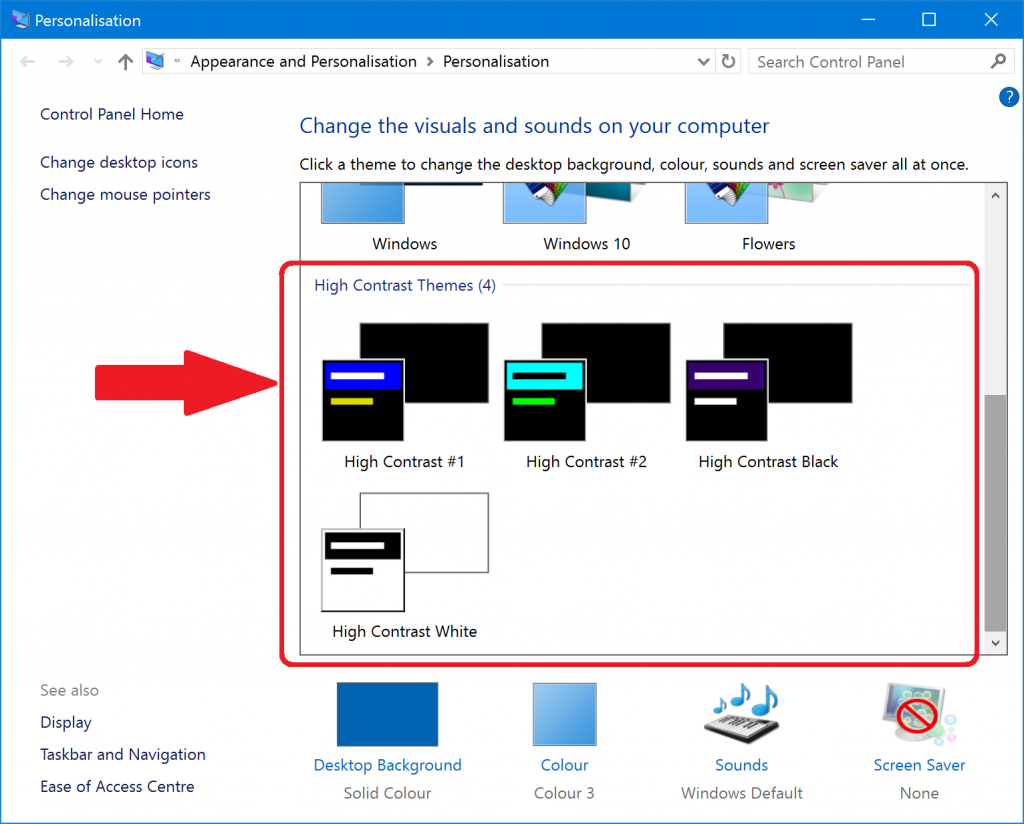
Click/select one of the themes and you get the results instantly.

You will find that signing out and signing in again is needed for the full effect of the themes to be observed.

Make some text in Windows bigger and bolder

If you go to “Start”, “Control Panel”, “Hardware and Sound”, “Display”, you will find a “Change the text size only” section. This lets you make various bits of text in Windows bigger: not that many, sadly, but still some.
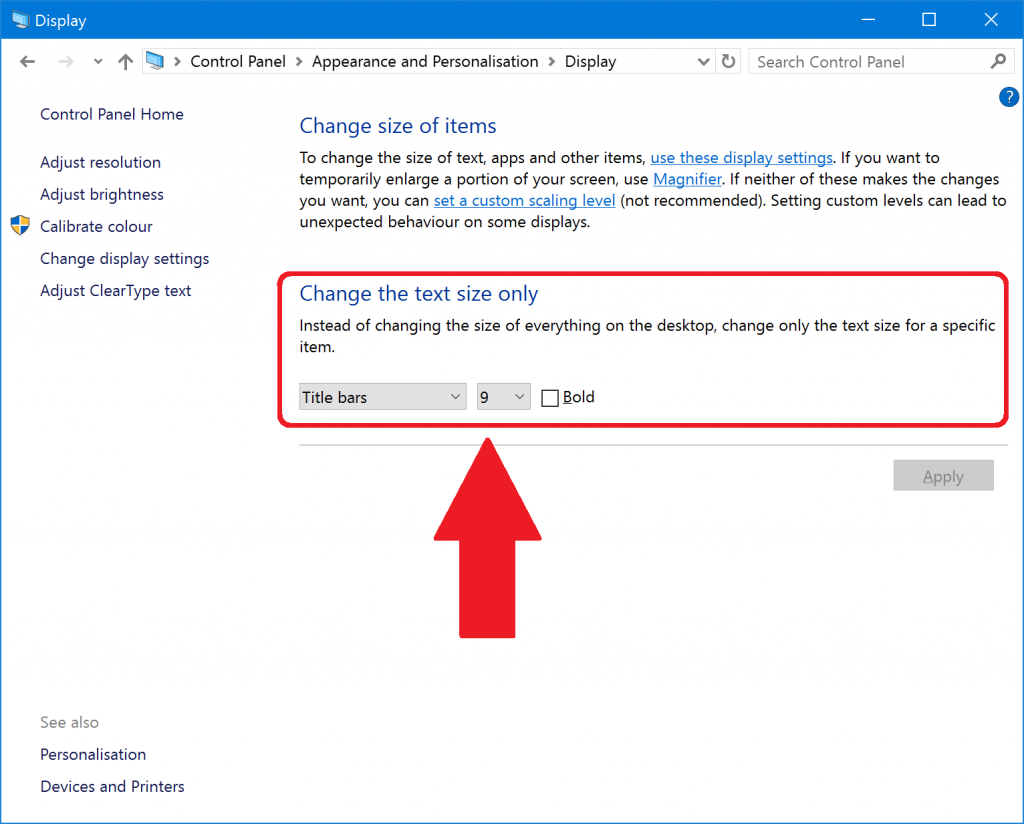
Use the comboboxes to change text (font) size for items in Windows.

“Icons” does the icons on the Desktop, which is good and bad: bigger text is easier to read, but there isn’t much space for icon text on the Desktop so you will quickly find it gets truncated. Go to the Desktop itself, right-click the mouse to bring up the context menu, select “View” and “Large Icons” to help.

You may find that you have to sign out and sign in to see the changes. You might also have to select a High Contrast theme (see above) to have the changes take effect.

Try using Windows Narrator (Windows 8 and later)

Windows Narrator is the Microsoft free, built-in screenreader. A screenreader is software that reads out the screen. It wasn’t very powerful before Windows 8, but it’s pretty good now, and the voices it uses for reading are better, and it even works in Microsoft Word. You can start Narrator from “Start” like any program, but you can also set it to start when you start the computer.

A particularly useful function for someone who still has some sight is that you can make it speak whatever you point the mouse at. In the Narrator settings, select “Navigation” and check “Read and interact with the screen using the mouse”.
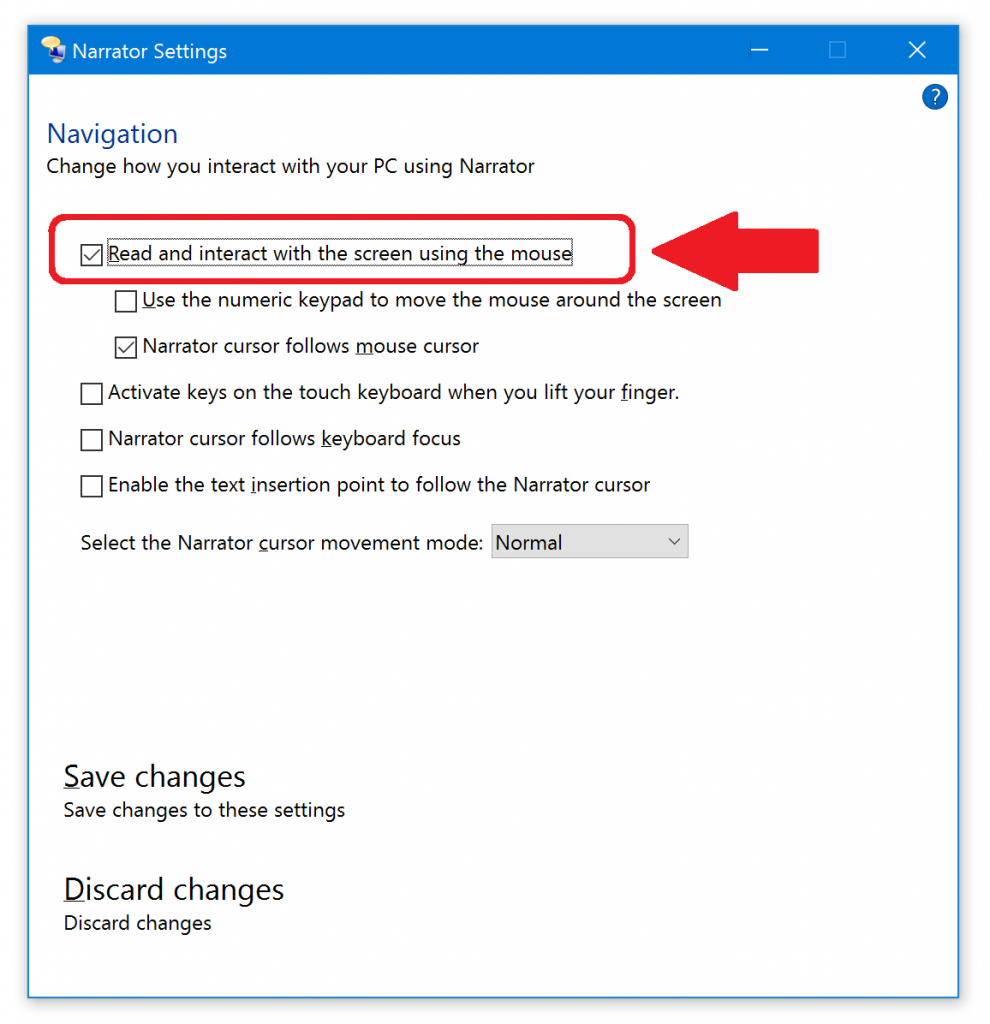
Windows Narrator settings showing how to turn on "read whatever I point at with the mouse"

This will let you point the mouse at text and hear aloud what it says. Turn off the other speech options and that will stop it chattering when other things happen so you are not confused. Press the Control key at any time to stop Narrator speaking immediately.

You can also easily use Narrator to read a Word document out loud to you. Click in the Word document to choose where to start. Then press the Capslock key and the M key together. Narrator will read and scroll through the document. Again, Control key stops reading.

Try using Windows Magnifier (Windows 8 and later)

Magnifiers make part of the screen bigger, which sounds like a totally perfect solution until you try it and realise that you get completely lost on the screen really easily. You may find that this is therefore too hard to use: try changing the screen scaling or resolution instead (see above).

You can press the Windows key and tap the Plus key or Minus key to turn on and adjust the Magnifier any time you want, so you could use it for some quick magnification to check something out then zoom back out to 100% so you don’t get lost.

Magnifier does have one additional feature that might be useful: you can set magnification to 100% (i.e. no magnification) and turn on “Turn on colour inversion” to make your screen yellow-on-black instead of the normal black-on-white. This has the advantage, or disadvantage, of affecting absolutely everything on the screen. Selecting a High Contrast theme does not – things like videos in web pages and icons and some applications will retain their normal colours. You will almost certainly not need both High Contrast and colour inversion.

Try using NVDA

Non-Visual Desktop Access is a fully-featured free screenreader for completely blind people. It has loads of features and is completely free with a strong volunteer community. However, it’s a “proper” program for blind people, so it’s focused on being powerful but will require some work to learn it – notably the shortcut keys you use to get around.

Try using WindowEyes

This is not a free piece of software. However, Microsoft has done a deal with the makers of WindowEyes, Ai Squared, and if you have a copy of Microsoft Office you can get a free copy of WindowEyes.

WindowEyes is a fully-featured professional screenreader and magnifier, so is more powerful and have more features than Narrator or Magnifier:

I hope these suggestions are helpful! Let me know if I’ve missed anything obvious out.

Additional Notes

  • If changing the screen scaling or DPI works for you but you want things a bit bigger than the slider allows, there is a second place to set the screen scaling or DPI. “Start”, “Control Panel”, “Hardware and Sound”, “Display” has a “Change size of items” section. In there is a link to “set a custom scaling level”, which has a drop-down combo box with more scaling options than you get from the Settings option. This is more likely still to break older applications, but do try it out. On my machine, I can go up to 500% here but only 300% on the Settings option.
  • You can also check the box “Enable pointer shadow” in the Mouse settings to give your mouse pointer a tail as you move it, which again makes it easier to find on the screen: just wiggle it and spot its tail.
  • You can also buy stick-on large bright letters and numbers for your existing keyboard if you prefer not to buy a high-visibility one.

MSAA, UIA and WinForms in .Net

Another item for programmers, more on UIA and MSAA and developing accessible user interfaces, following on from using WPF/XAML with MSAA and UIA.

This is a super-quick guide to using WinForms to make UIs that work well with screenreaders like NVDA or Thunder or JAWS.

  • You don’t need to do anything to Button, CheckBox, MenuItem or MenuStrip controls – other than put some text on them! Image-only controls are no good. It’s fine if only the image is shown to the end user and the text is hidden.
  • You can correctly label content controls that don’t have a Text property, like TextBox, ListBox, ListView, ComboBox, ProgressBar and the like, in one of two ways:
    • Put a Label just before the control you want to label in the tab index order. The Text on the Label labels the control. Use the TabIndex property to make sure the order is correct.
    • Set the AccessibleName property on the content control itself. This labels the control for the screenreader.
  • Groupbox controls don’t label their contents, use one of the other techniques here.
  • You almost certainly want to avoid labelling Panel controls, since they are generally for layout, which is communicated to the screenreader user in other ways than labeling.
  • For WebBrowser controls you need to think about the content in terms of web accessibility – use label elements, ARIA, and other HTML accessibility techniques. You might also need to label the actual WebBrowser control on your form with a Label or AccessibleName, just like any other content control.

Unsurprisingly, these techniques are basically the same as writing forms using the Windows C++ API, since WinForms is a wrapper round that.

MSAA, UIA and WPF

A technical note today for programmers.

Screenreaders (blind users) interact with Windows programs through accessibility APIs. The most modern is UI Automation. But the first, and possibly most important still, is MSAA, Microsoft Active Accessibility. Windows will supply information from one interface to the other system if required, so most of the time you shouldn’t have to worry too much.

I’ve been doing some .Net programs using WPF or XAML (that is, not WinForms) and here’s a quick guide to what I’ve found:

  • Buttons and CheckBoxes work fine just as they are. In fact, don’t set any Automation properties or you’ll get odd-looking controls in MSAA.
  • ListBox, ComboBox, TextBox, ProgressBar work fine for their contents just as they are. But:
  • Labels don’t label Listbox/ComboBox/TextBox/ProgressBar unless you use LabeledBy.

In C++ applications you associate labels (e.g. “Enter username:”) with the control they are labelling (e.g. a textbox for the username) by using tab order. The label with tab index N labels the control with tab index N+1. So label with tab index 0 provides the name to the combobox with tab index 1.

In WPF you have to set this explicitly using AutomationProperties.LabeledBy, like this:

<Label Content="A ListBox Control:" x:Name="lblList"></Label>
<ListBox AutomationProperties.LabeledBy="{Binding ElementName=lblList}">
  <TextBlock>Elephant</TextBlock>
  <TextBlock>Koala</TextBlock>
</ListBox>


Note the funky “Binding” code – you can’t just use the x:Name of the label. Notice also that your Label must have an x:Name! You can also use a TextBlock instead of a label. Generally the pattern is:

<TextThing Content=”The label for the other control” x:Name=”textThingLabel” />
<OtherControl AutomationProperties.LabeledBy=”{Binding ElementName=textThingLabel}” />


Anyway, that suffices for the basics of MSAA/UIA support for WPF if you’re writing .Net Windows applications.

Microsoft Speech

Updated September 2020.

Microsoft Windows has had a number of speech systems over the years. Windows 10 has made more changes, and the MSDN documentation is fragmented and confusing. Here, then, is a description of Microsoft speech systems on desktop Windows as of November 2016, mainly for developers and enthusiasts.

The three systems are SAPI5, Microsoft Speech Server, and the new system for Windows 10, the variously-named Windows Runtime or Bing or Mobile system.

SAPI5, Microsoft Speech API version 5 (System.Speech.Synthesis)

From Windows XP onwards, this is the main Windows speech system for desktop applications, like screenreaders. It’s got a huge range of voices from third parties like Acapela, Nuance, Cereproc and Ivona.

  • The default Windows Voices have been SAPI5 since Windows XP. Microsoft Sam in Windows XP, Microsoft Anna in Windows Vista and 7, Microsoft Hazel in Windows 8 and 10.
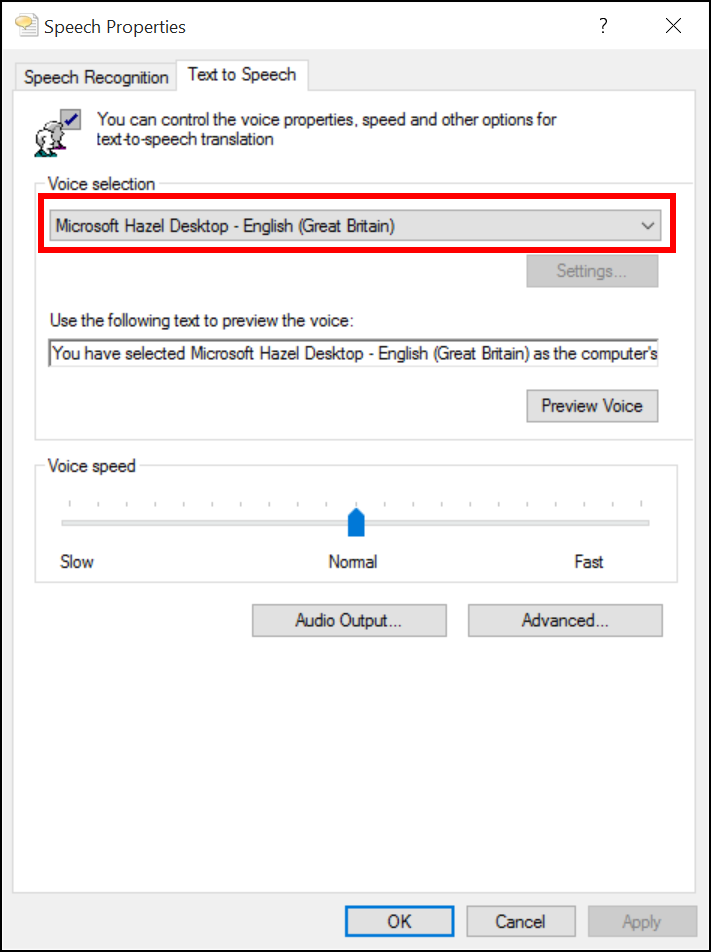
  • You can find SAPI5 voices that are installed on your machine in the Control Panel. You are looking for the Text to Speech window, which is hidden away in the Speech Recognition settings in Control Panel. Some SAPI5 voices may be hidden (e.g. Acapela voices) but the ones you can see there can generally work in any program that uses SAPI5:

  • You can get lots and lots of SAPI5 voices from third parties, including the free eSpeak.
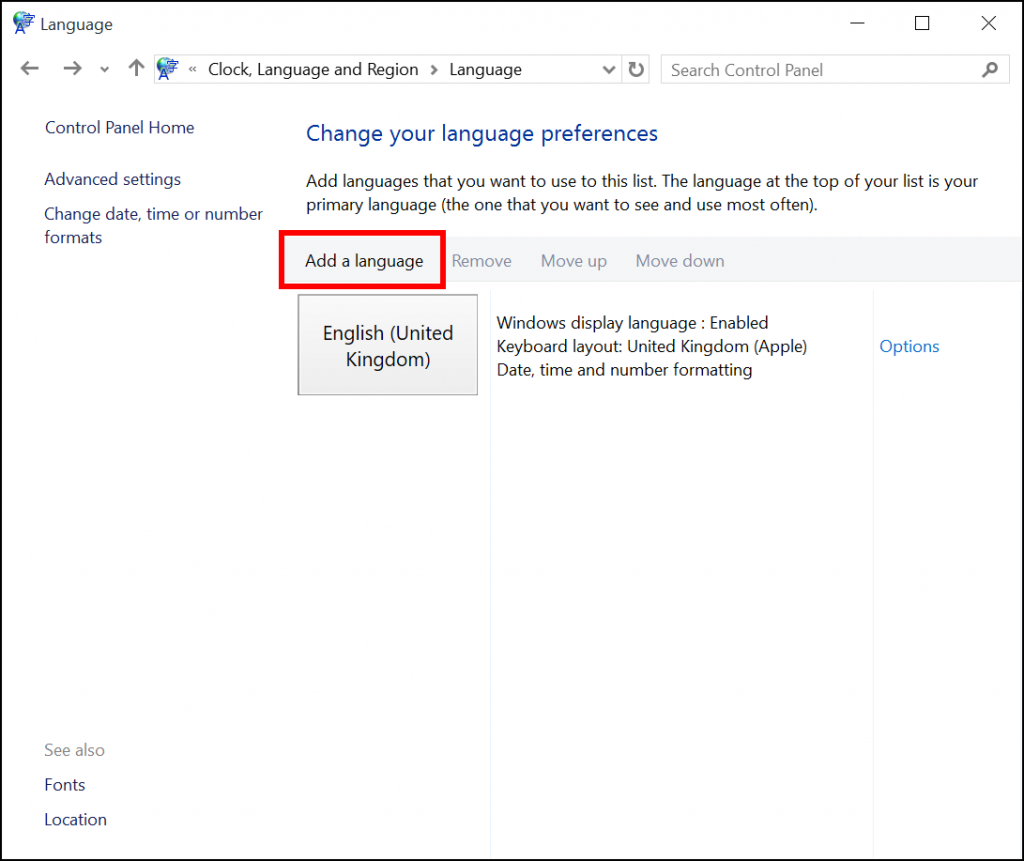
  • You can also get new SAPI5 voices from Microsoft by installing a new Language Pack from Control Panel. Language Packs are all free for Windows 8 and later (and mostly free for Windows Vista and 7 too) and some of them come with SAPI5 voices. For example, if you install the French language pack, you get a French SAPI5 voice that appears in Control Panel and can be used in software that supports SAPI5. List of free SAPI5 voices on Windows 8 and Windows 10

  • Voices can be either 32-bit or 64-bit, just like Windows. If you’re on a 64-bit Windows machine, 32-bit voices won’t show up in the Speech window in Control Panel, because it is a 64-bit version of the Speech window. You have to find and run C:\Windows\SysWOW64\Speech\SpeechUX\sapi.cpl to see 32-bit voices. Also, 64-bit programs won’t see or be able to use 32-bit-only SAPI5 voices.
  • You can find the installed voices in the registry, under HKEY_LOCAL_MACHINE > Software > Microsoft > Speech, or if you are on a 64-bit machine, both that key and in HKEY_LOCAL_MACHINE > Software > WOW6432Node > Microsoft > Speech for the 32-bit voices. You can more rarely find per-user installation of SAPI5 voices in HKEY_CURRENT_USER > Software > Microsoft > Speech.
  • There was a SAPI4, which was the predecessor to SAPI5, and shipped in Windows 2000 and as part of Microsoft Agent. It was similar to SAPI5. No-one uses it nowadays (this is almost certainly untrue, but as a general rule, it’s all SAPI5 now.)
  • Developers: The Desktop Windows API you use in .Net is System.Speech.Synthesis and the SpeechSynthesizer class, which is a wrapper round the SAPI5 COM object. You can use SAPI5 on Windows Server or desktop versions. SAPI5 is also available through a COM interface for C++ and other programming languages, Microsoft Speech Object Library.
  • Microsoft Speech API (SAPI) 5.3 on MSDN

Windows Mobile, Windows Runtime, or Bing Speech Services

Windows Mobile, which became Windows Phone, and is at the time of writing becoming Windows 10 Mobile, has a text-to-speech system. It’s “the text-to-speech you can use when you are writing Windows Phone Apps.” In some places on the Microsoft website it’s called the Bing Speech Service, but I don’t know how long that will last.

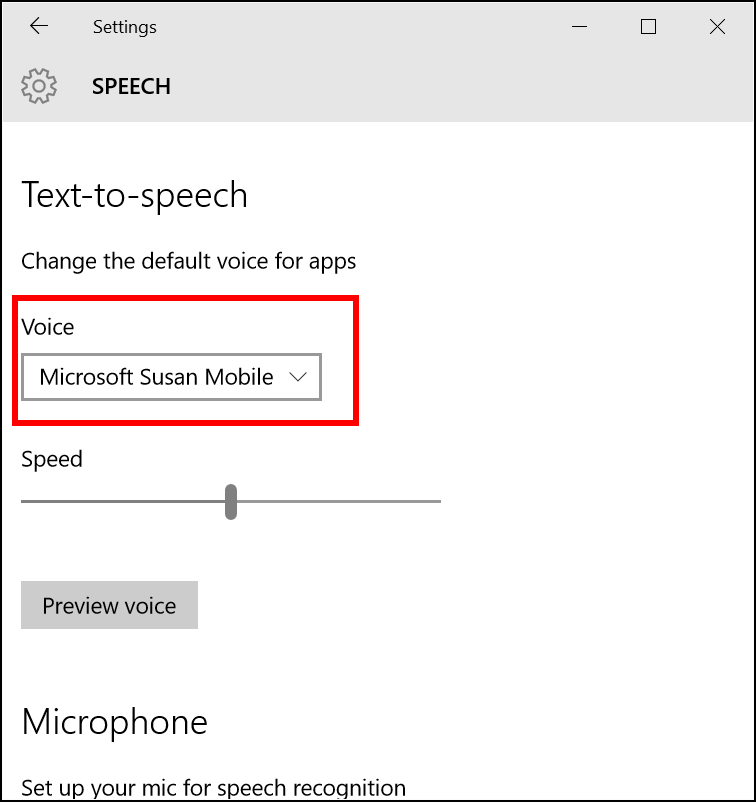
The interesting thing is that this system, and the voices that come with it, have landed on desktop Windows with the arrival of Windows 10. If you open up the Settings App in Windows 10, as opposed to the old Control Panel, you’ll find a Speech setting. This lists different voices from the SAPI5 list: on my Windows 10 UK English machine I have Microsoft Susan Mobile and Microsoft Heera Mobile. These are NOT SAPI5 voices. It’s ANOTHER speech API on your Windows 10 machine. It’s used by Windows Store Apps only (again, now called Universal Windows Platform apps).

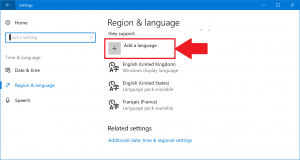
  • Like SAPI5 voices, you get more by adding Languages to Windows. However, you can’t use the Languages and Language Packs in Control Panel: this gets you SAPI5 voices. You have to use the new Settings App and the Language settings. This gets you more Mobile voices.Open Settings in Windows 10 and go to Time & Language, then Region & Language, and Add a language.

    Select your new language and click the Options button

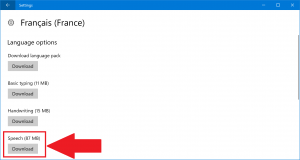
    Click Download for the Speech option.

  • These Mobile voices can now be used by normal Windows applications, but the developer will have to write support for them into their programs – they don’t show up in the SAPI5 system.
  • Conversely, SAPI5 voices cannot be used in Windows Store Apps, which can only use this Windows Mobile system.
  • You can find the installed voices in the registry, under HKEY_CURRENT_USER > Software > Microsoft > Speech Virtual and in HKEY_LOCAL_MACHINE > Software > Microsoft > Speech_OneCore (duplicated in HKEY_LOCAL_MACHINE > Software > WOW6432Node > Microsoft > Speech_OneCore for 32-bit machines.)
  • There’s ALSO an online Bing Speech service, also called Microsoft Translator, now called the Bing Speech API in Microsoft Cognitive Services. This is a web service you call with text to get audio files back with the speech you requested. So it’s not something you use on your Windows machine (though a website or App might).
  • Developers: the API you use in .Net is Windows.Media.SpeechSynthesis and the SpeechSynthesizer class. This works just like the .Net SAPI5 API, System.Speech.Synthesis, but it’s targeted at Windows Store Apps / Windows Runtime Apps / Universal Windows Platform Apps. So System.Speech.Synthesis is Desktop, and Windows.Media.SpeechSynthesis is Windows Runtime, and they are completely different systems. As of Windows 10 Anniversary Edition in 2016 you can access the Windows.Media.SpeechSynthesis API from desktop apps, so you should be able to access these voices – but you’ll have to write specific code for them, you can’t use the SAPI5 API.
  • You CAN actually get the Mobile voices to work with SAPI5, but you have to hack the registry, and since I might end trying to fix your computer when you’ve done this I’m not going to give you detailed instructions. Essentially, copy the Tokens registry key for the Mobile voice into the SAPI5 Voices key in HKLM > Software, do the same for 32-bit if necessary, and there you go!
  • Finally, also lurking in the same speech system are the Cortana voices, used by Microsoft’s Cortana digital personal assistant. They are also described in the same registry key but don’t show up in Windows.Media.SpeechSynthesis. Hacking the registry will probably enable them.

Microsoft Speech Platform

This is a set of voices and yet another speech system, but for use on Microsoft Windows Server. SAPI5 doesn’t work on Windows Server. They are intended to provide speech for servers, like automated voice menus when you call somewhere, that kind of thing. They aren’t intended for desktop programs.

  • This has Microsoft-only voices, and they won’t work with SAPI5 programs (or Windows Store Apps). A program could use them if the developer writes the code for it: the NVDA screenreader has done so, so you can install Microsoft Speech Platform and use the voices in NVDA.
  • You get the engine and the voices as installers from the Microsoft website, and install them on your server.
  • Developers: this uses the Microsoft.Speech API in .Net.
  • Microsoft Speech Platform on MSDN

Microsoft UI Accessibility Checker 2.0

I’ve been doing some application building in the last few days, and I’ve found Microsoft’s (newish) free AccChecker program enormously helpful.

In some ways it’s much like the old MSAA tools AccExplorer32.exe and inspect32.exe. You can navigate around the MSAA tree for a program/window, explore what controls work and what don’t, and check you or your GUI toolkit have correctly populated the necessary accessibility information. Because Microsoft is trying to push us all to using UI Automation instead of MSAA it also provides you with the full range of the richer UIA content.

This’ll be especially useful as we try to support things like text rendered using DirectDraw/DirectX in Internet Explorer 9 (breaking lots of offscreen models). But in any case it’s an enormously useful utility. It’ll check tab order, screenreader views, UIA errors and even provide you with priorities and commentary on problems. Finally, the code is available from CodePlex to demonstrate the UIA techniques involved: great for anyone writing UIA support for AT or scripting.

Download AccChecker 2.0, June 2010

Windows 7 UI structure and shortcut keys for screenreader and switch users

Many people using assistive technology have to learn ways of doing things quite different from the “see, move mouse, click” paradigm most users can employ. For (blind) screenreader users it’s vital to know shortcut keys, and for both screenreader and (physically-impaired) switch users a good knowledge of the structure of common Windows user interface artifacts, like Explorer or the Start menu, is enormously important for getting the most out of their system.

Microsoft has provided “A Guide to Transitioning to Windows 7”, a Word document that provides a detailed examination of the Windows operating system user interface for people not using a screen and/or mouse. For example, it describes how to interact with the Ribbon interface used in Office 2007 and 2010 and now in applications like Paint.

It will be of use to high-level screenreader and switch users and user interface and AT developers who want to know how things (are supposed to) work for AT users.