This is a set of suggestions and tips for helping you or someone you know with problems with sight to use their Windows computer. It’s probably most useful for a technically-minded person looking to help someone with sight loss but still some vision. Age-related sight loss, for example. If you are completely blind you will need a screenreader and more specialist training.
The focus is on changing Windows settings and free and low-cost software. It’s basically the things I would do if I was round your house trying to get your PC set up to be useful for you.
I’m assuming you’re on Windows 10, which has better accessibility features than previous versions. Windows 8 is just about as good, and Windows 7 is okay, but earlier than that and you really should upgrade.
I start, though, with a couple of hardware suggestions.
Get a big TV or monitor
If you have an HDMI output from your computer (most computers do nowadays) you can plug it into a big television or a big monitor to give you a bigger brighter display. A relatively inexpensive 22″ TV will work fine. You can try plugging your TV in to see how it works!
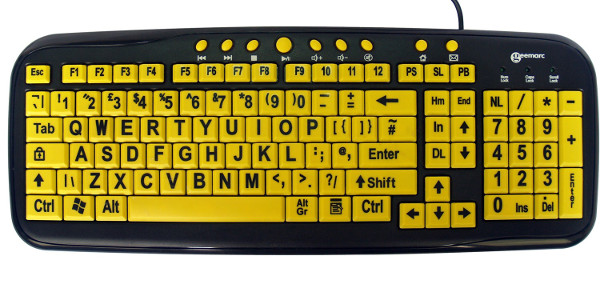
Get a high-visibility physical keyboard
You can buy keyboards with bright big yellow-on-black keys. This will help you find all the key combinations you’re going to be using. For example, from the RNIB Shop:
Now on to changing your Windows settings.
Change your display scaling and/or screen resolution
This is surprisingly tricky because there are two settings in Windows that interact.
You can change the screen scaling or DPI (dots per inch). This is in “Start”, “Settings”, “System”, “Display”, “Change the size of text, apps and other items”. Drag the slider left to make things smaller and right to make them bigger.

You’ll have to sign out and sign in to see the full effects. You might not be able to drag the slider to make things bigger if you have a low-resolution screen: see “Get a big TV or monitor” above or read on.
Changing the screen scaling or DPI used to work very badly: lots of applications would not display correctly, with overlapping text and missing buttons. Nowadays things work much better. Note that older Windows machines (e.g. Windows 7) won’t let you scale much here so you’re better off with Windows 10.
The alternative to changing the screen scaling or DPI is to change the screen resolution. This is a cruder option, but means every application continues to display correctly. It won’t look pretty to people with good vision, but you probably don’t care about that. This is in “Start”, “Settings”, “System”, “Display”, scroll to the bottom and follow the “Advanced display settings” link, and change the value in the “Resolution” box. The smaller the resolution – the lower the numbers – the bigger everything will get. 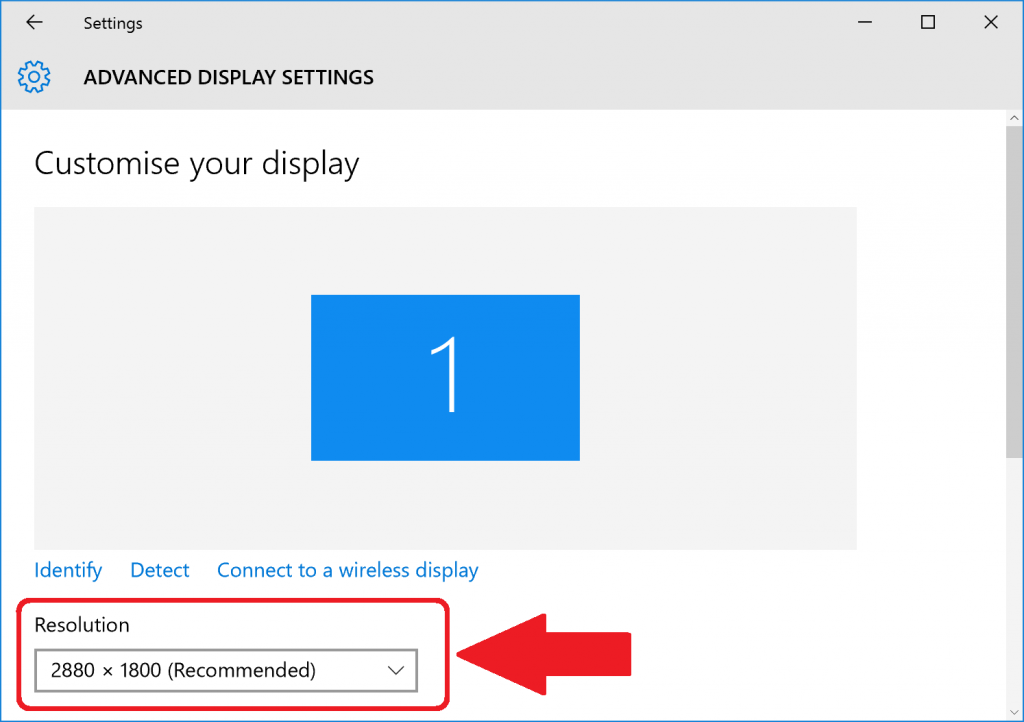
Again, sign out and in to check the full effects.
Finally, things get trickier if you have multiple monitors – like a really big screen plugged into your laptop. You may find some resolutions or scaling levels are unavailable. You could try restricting Windows’ output to just the big monitor you want to use by pressing the Windows key and P together to bring up the Project options, then selecting “Second screen only”. There is more complexity over choosing monitors that I won’t go into here, but “Display” is where you’ll find settings if you look.
Whichever way you do it, some things won’t fit on the screen if you make everything really big. Not much you can do about that.
Make the mouse pointer bigger
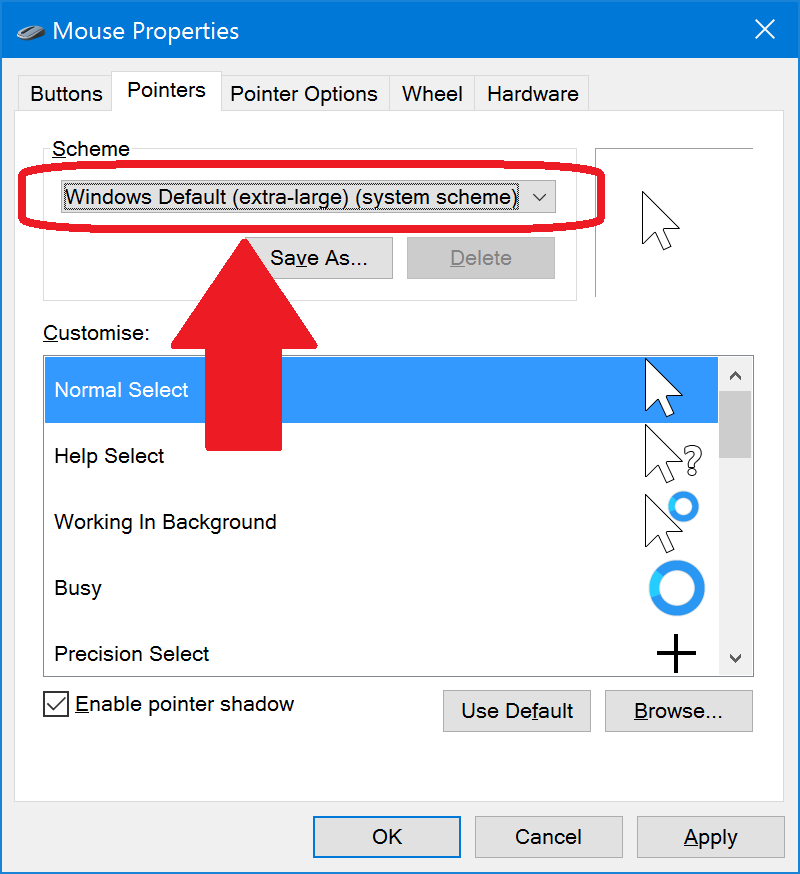
“Start”, “Control Panel”, “Hardware and Sound”, and under “Devices and Printers” you’ll see a link for “Mouse”. Go to the “Pointers” tab and select the drop-down in the “Schema” section. There you will find several schemes labelled “extra-large” that make the mouse pointer bigger and easier to see.
Switch to a High-Contrast Theme
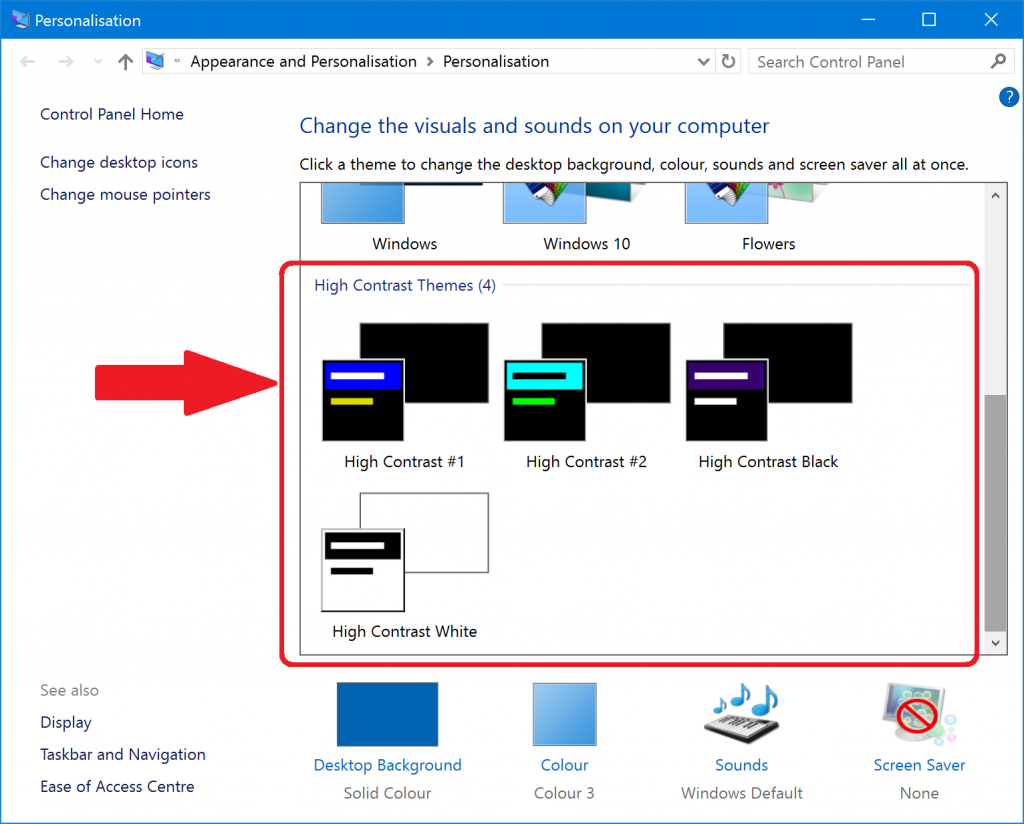
These make Windows use more contrasting colours for things like window edges and title bars so you can see them more clearly. You can also make the colour scheme yellow or white on black, which might be easier on your eyes.
You can find the High-Contrast themes in “Start”, “Control Panel”, “Appearance and Personalisation”, “Personalisation”. Under “Change the visuals and sounds on your computer” you’ll find four themes labelled “High Contrast”. Pick one of those to try it.
You will find that signing out and signing in again is needed for the full effect of the themes to be observed.
Make some text in Windows bigger and bolder
If you go to “Start”, “Control Panel”, “Hardware and Sound”, “Display”, you will find a “Change the text size only” section. This lets you make various bits of text in Windows bigger: not that many, sadly, but still some.
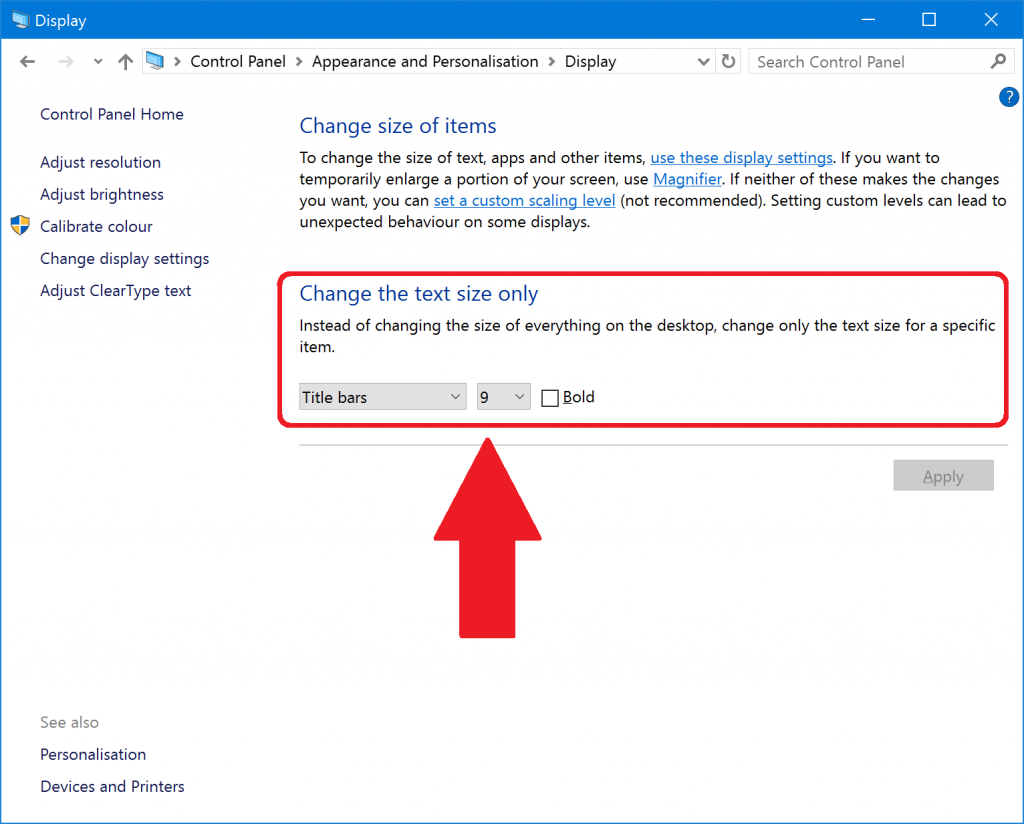
“Icons” does the icons on the Desktop, which is good and bad: bigger text is easier to read, but there isn’t much space for icon text on the Desktop so you will quickly find it gets truncated. Go to the Desktop itself, right-click the mouse to bring up the context menu, select “View” and “Large Icons” to help.
You may find that you have to sign out and sign in to see the changes. You might also have to select a High Contrast theme (see above) to have the changes take effect.
Try using Windows Narrator (Windows 8 and later)
Windows Narrator is the Microsoft free, built-in screenreader. A screenreader is software that reads out the screen. It wasn’t very powerful before Windows 8, but it’s pretty good now, and the voices it uses for reading are better, and it even works in Microsoft Word. You can start Narrator from “Start” like any program, but you can also set it to start when you start the computer.
A particularly useful function for someone who still has some sight is that you can make it speak whatever you point the mouse at. In the Narrator settings, select “Navigation” and check “Read and interact with the screen using the mouse”.
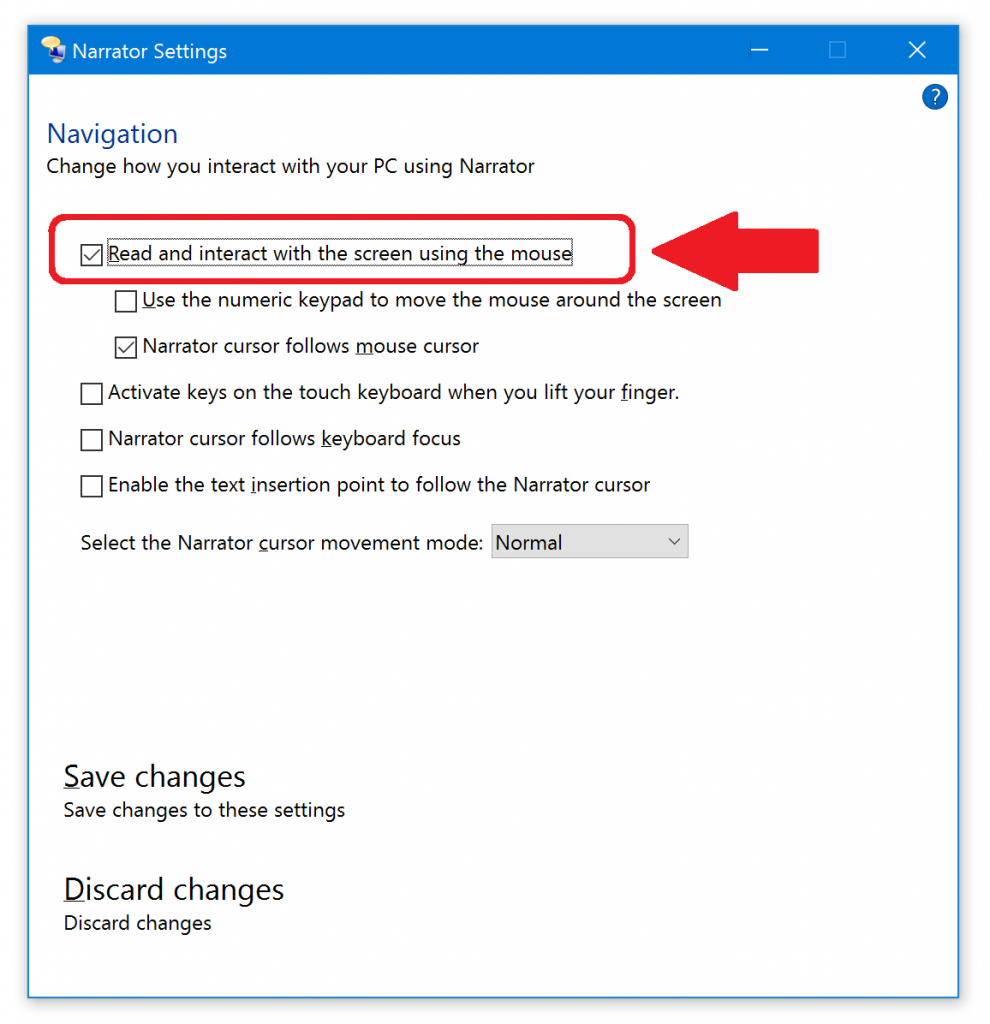
This will let you point the mouse at text and hear aloud what it says. Turn off the other speech options and that will stop it chattering when other things happen so you are not confused. Press the Control key at any time to stop Narrator speaking immediately.
You can also easily use Narrator to read a Word document out loud to you. Click in the Word document to choose where to start. Then press the Capslock key and the M key together. Narrator will read and scroll through the document. Again, Control key stops reading.
Try using Windows Magnifier (Windows 8 and later)
Magnifiers make part of the screen bigger, which sounds like a totally perfect solution until you try it and realise that you get completely lost on the screen really easily. You may find that this is therefore too hard to use: try changing the screen scaling or resolution instead (see above).
You can press the Windows key and tap the Plus key or Minus key to turn on and adjust the Magnifier any time you want, so you could use it for some quick magnification to check something out then zoom back out to 100% so you don’t get lost.
Magnifier does have one additional feature that might be useful: you can set magnification to 100% (i.e. no magnification) and turn on “Turn on colour inversion” to make your screen yellow-on-black instead of the normal black-on-white. This has the advantage, or disadvantage, of affecting absolutely everything on the screen. Selecting a High Contrast theme does not – things like videos in web pages and icons and some applications will retain their normal colours. You will almost certainly not need both High Contrast and colour inversion.
Try using NVDA
Non-Visual Desktop Access is a fully-featured free screenreader for completely blind people. It has loads of features and is completely free with a strong volunteer community. However, it’s a “proper” program for blind people, so it’s focused on being powerful but will require some work to learn it – notably the shortcut keys you use to get around.
Try using WindowEyes
This is not a free piece of software. However, Microsoft has done a deal with the makers of WindowEyes, Ai Squared, and if you have a copy of Microsoft Office you can get a free copy of WindowEyes.
WindowEyes is a fully-featured professional screenreader and magnifier, so is more powerful and have more features than Narrator or Magnifier:
I hope these suggestions are helpful! Let me know if I’ve missed anything obvious out.
Additional Notes
- If changing the screen scaling or DPI works for you but you want things a bit bigger than the slider allows, there is a second place to set the screen scaling or DPI. “Start”, “Control Panel”, “Hardware and Sound”, “Display” has a “Change size of items” section. In there is a link to “set a custom scaling level”, which has a drop-down combo box with more scaling options than you get from the Settings option. This is more likely still to break older applications, but do try it out. On my machine, I can go up to 500% here but only 300% on the Settings option.
- You can also check the box “Enable pointer shadow” in the Mouse settings to give your mouse pointer a tail as you move it, which again makes it easier to find on the screen: just wiggle it and spot its tail.
- You can also buy stick-on large bright letters and numbers for your existing keyboard if you prefer not to buy a high-visibility one.
I think this article is brilliant! Some of the rudimentary things – like resolution for example – I knew about, but most of it was completely new, and much appreciated.
A most helpful article!
Best
Medford
Didn’t say anything about using pc as a totally blind user, and that’s what i’d like to know.
Thank you. Very informative. I am trying to provide support to a ‘totally blind’ Windows 10 user. Would you please consider updating your article to cover Windows 10 and new features like Cortana? Also, if there are more configuration changes for ‘totally blind’ users. My friend is already using the Dolphin screen reader and we’re trialling NVDA.
Many thanks for your good work.